In this blog, we will see the capabilities of an AR app powered with the ARCore by Google
ARCore Featured these three capabilities for an AR Developer:
- Motion tracking.
Allows the device to track and understand its position in the real environment
- Environmental understanding.
Allows the device to detect the size and location of all type of Planes/surfaces like the ground, a coffee table or walls.
- Light Estimation.
Allows the device to calculate the environment’s current lighting conditions.
Fundamentally, What ARCore does is
- To track the position of the mobile device as soon as it moves
- Build its own understanding of the real environment/world.
Motion tracking technology of ARCORE uses the device’s camera to identify points, denoted as features in ARCOre, and keeps on tracks how those points move over time. With a combination of the movement of feature points and instructions of the phone’s inertial sensors ARCore calculates both the orientation and position of the phone as it moves.
In addition to identifying feature points, ARCore can detect surfaces(flat), for example like a table, floor, and can also calculate the average lighting in that area around it. These capabilities in combination enable the ARCore to build its own understanding of the environment.
Its understanding of the real environment lets you place 3D objects, or other digital information in a way that it looks real with the real environment. Motion tracking makes the device capable of move around and views these objects from any angle and even if you turn or leave the room the object will be right where you left that.
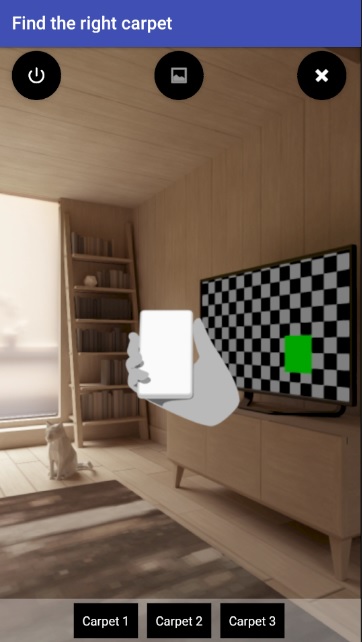
Let’s start with an example for a Carpet app which will let the user search for a plane surface and place a Carpet on the surface to check how the carpet suits in their room.
Steps –
- Create a New Android Project(using Android Studio).
- Add the dependency in App Gradle file as –
// Provides ARCore Session and related resources.
implementation ‘com.google.ar:core:1.5.0’
// Provides ArFragment and other UX resources.
implementation ‘com.google.ar.sceneform.ux:sceneform-ux:1.5.1’
implementation ‘com.google.ar.sceneform:assets:1.5.1’
// Alternatively, use ArSceneView without the UX dependency.
implementation ‘com.google.ar.sceneform:core:1.5.1’
- Setup Android Emulator for this (This link will guide you through the process).
- Download the 3D Objects from here
- For this example, I am using this object for Carpet
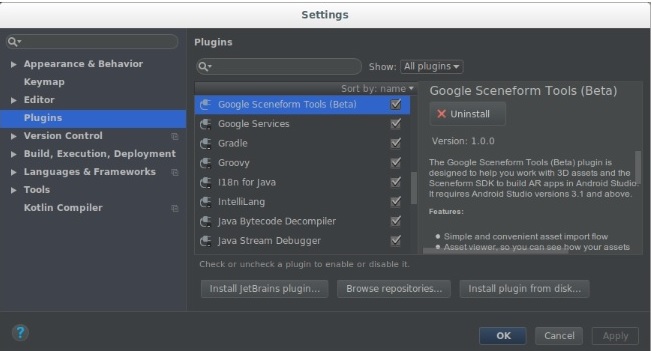
- Import and Preview 3D assets you want in your AR app after installing the plugin in Android Studio as in Fig 1
Steps to install the “Google Sceneform Tools (Beta) plugin” –
-
- File > Settings >Plugins >Browse Repositories
- Install Google Sceneform Tools (Beta).
For more details on importing an asset to your project visit the link.
Now, Let’s start with the coding part –
- Open your Activity’s Layout file add the button (you can add more if you want) namely
- Carpet with attribute <android:onClick=”Carpet”>
- Add a fragment for the ARView as below:
<fragment
android:id=”@+id/sceneForm”
android:name=”com.google.ar.sceneform.ux.ArFragment”
android:layout_width=”match_parent”
android:layout_height=”match_parent” />
- Open your Activity Class and add below variables and Methods:
Variables
- ArFragment arFragment;
- TransformableNode transformableNode;
- AnchorNode anchorNode;
Methods
This method is used to perform click action of the button:
public void Carpet(View view) {
ClearObjectsFromScene();
addObject(Uri.parse(“carpet.sfb”));
}
This method will return the center point of the current view:
private Point getDeviceScreenCenter() {
View vw = findViewById(android.R.id.content);
return new Point(vw.getWidth() / 2, vw.getHeight() / 2);
}
This Method is used to clear the Scene before adding any new Object:
private void ClearObjectsFromScene() {
List<Node> children = new ArrayList<>(arFragment.getArSceneView().getScene().getChildren());
for (Node node: children) {
if (node instanceof AnchorNode) {
if (((AnchorNode) node).getAnchor() != null) {
((AnchorNode) node).getAnchor().detach();
}
}
}
}
Add this below line in the OnCreate Method of your Activity to initialize the variable:
arFragment = (ArFragment) getSupportFragmentManager().findFragmentById(R.id.sceneForm);
Below is the name of three methods which are very common to use in Google Scene forms app to place any object in the scene.
- addObject()
- placeobject()
- addNodeToScene()
You can add these three methods from this link
Note – When you import a 3D asset with Google Sceneform Tools (Beta) plugin you will get an SFB file generated in the assets Folder of your APP make sure you are using the appropriate name in the OnClick function to add those in Current Scene as the URI.
Give it a try you will see the application running as the below screenshots –