Formatting Rules specify the format for the SharePoint InfoPath Form’s control. InfoPath form automatically validates the data you entered and if the required condition gets matches, it applies the formatting on that specified control. This Rule can apply directly on any field or by on Page Load event or any Button’s onclick event. By applying the formatting on the control, you can make the text of the control bold, underline, italic, strikethrough, the color of texts, set the background color of the control. Also, we can hide the control from UI of the form or disable the control.
Formatting Rules can apply in either of the following 2 ways:
By Add Rules: By Add Rules option, a new Formatting Rule can apply on the form control. Add Rule option can view on top ribbon of the form under the Home tab.

By Manage Rules: By Manage Rules option, a new Formatting Rule can apply on the form control as well as manage the existing applied rules of that control.
To apply the format on the form’s control, it is mandatory to set the required condition. For a single field’s validation, you can apply the multiple conditions using “And” or “Or” operators. Below is demonstrated to set formatting on control by Formatting Rule:
1) Open the InfoPath form and select the control on which you want to apply the Formatting Rule.
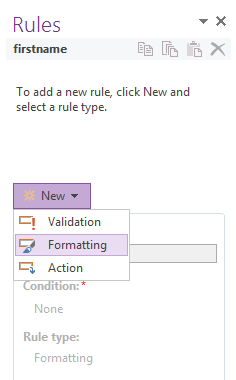
2) When you selected the control, then on top ribbon of InfoPath designer, you will get the “Manage Rules” option under the “Home” tab. Click on “Manage Rules” button.
3) On right to the InfoPath designer, a “Rules” window will get open.
4) From the “New” dropdown of “Rules” window, choose the “Formatting” option.
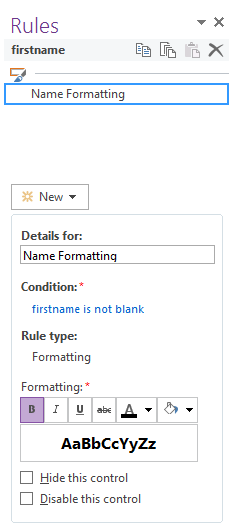
5) In “Details for” section (optional), you can add the name of your rule.
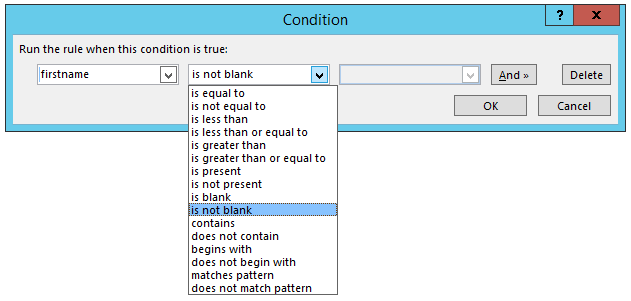
6) Click on “None” link in “Condition” section, a “Condition” dialog will get open.
7) The first down-down will show you all the fields of the form, from where you have to select the field name which field’s data you want to validate.

8) Next, select the condition which you wanted to be applied in the field. There is an “And” operator button which is provided to apply the multiple conditions on the field and validate the data. Now click “OK” to save the condition.
9) In the “Formatting” section, select the format which you want to apply on the form control.
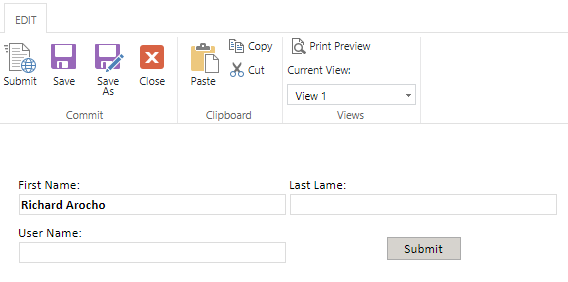
After applying the Rule to the control, save and publish the form in the Form library. Now, when you will going to enter the data in control on which you have applied the formatting, the output will look like below: