
Hi Folks, In this blog we will know about what is Alexa Skill ? and also how it works with customization.
Let’s start from the beginning to know about Alexa Skill and implement it step by step.
Alexa works as a cloud-based voice service provided by Amazon and is available on millions of devices from Amazon and third-party devices and deploying Alexa skills here,
Alexa Skills work as web service through JSON request/response. Alexa skills can be built in any language that can act as a web service. You can host an Alexa Skills using ASP.NET.
We will break this blog into two parts. In first part we are going to learn about how to create an AWS account and set up Visual Studio for Lambda service and also will try to write our own customized Alexa skill.
In the next part of a blog we will learn about how to deploy our customized Alexa skill for testing and published it in the AWS cloud and manage and call by AWS developer console.
Now, let’s take a look at these steps where will be covering in both two parts of a blog:-.
- Create an AWS account & set up Visual Studio for Lambda services.
- Write our Alexa Skill in C#.
- Deploy our Alexa Skill for testing.
- Publish an Alexa Skill.
Now, we are going to start first part of a blog where will cover above starting two steps.
- Create an AWS account & set up Visual Studio for Lambda services:-
1.1 Create an AWS account:-
Go to https://aws.amazon.com/ and click on the “Create an AWS Account”.
After creating an AWS account now, You’re ready to start building our customized Alexa skill.
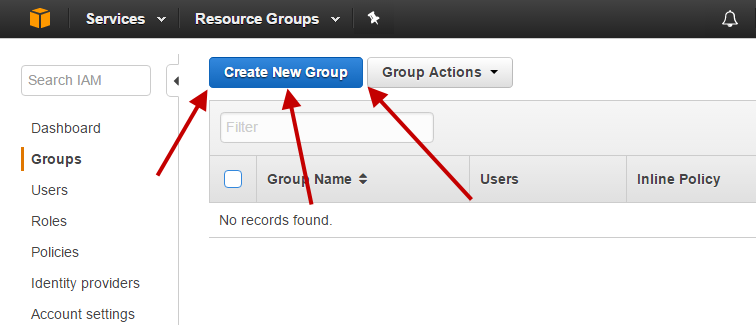
To the identity and Access Management, In the AWS Services, type IAM. Here we are going to set up:
- Create a group with admin privileges
- Create a user profile that will be assigned to created group
Click on Groups and on create New Group.We’re going to give our group AdministratorAccess
because this access policy will be used in our Visual Studio profile. When we’ll be deploying our code.
Now let’s create a user profile that will be assigned to created group.
Click Users and click the Add user button & give the user programmatic access and AWS Management console access.
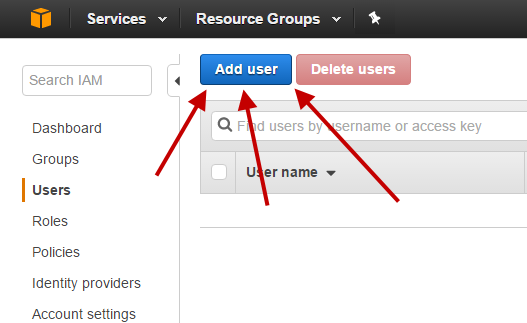
Let’s set the permissions for your user to the recently created group. Click Add user to group and select the created group. Click the Next: Review button, then click the Create user button.
After doing that you will be redirected to a completion page. Then download the csv and save it somewhere safe.
1.2 Set up Visual Studio for Lambda services:-
We have AWS account and we have created Group and User in the IAM. Now we are going to set up Visual Studio to connect to these account. Firstly we need to download the AWS Toolkit for Visual Studio and install it. This toolkit gives us templates we will use when we start building our skill, but it will also set up Visual Studio. With the help of this tool we can deploy straight to the AWS Lambda service.
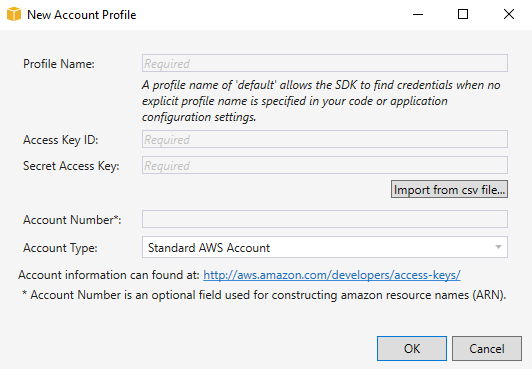
Go to the Visual Studio and open the AWS Explorer. Click the New Account Profile icon.and New Account Profile will be shown. Open that csv file you downloaded and transfer the Access Key and the Secret Access Key into the appropriate boxes. Your Account Number is
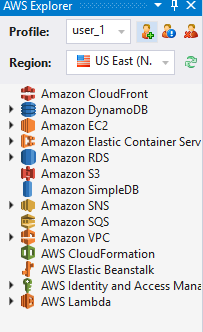
the Console login link. Press OK and you will be logged in. Your region should be set to Virginia (this is the only region that supports Alexa skills).
- Write our Alexa Skill in C#:-
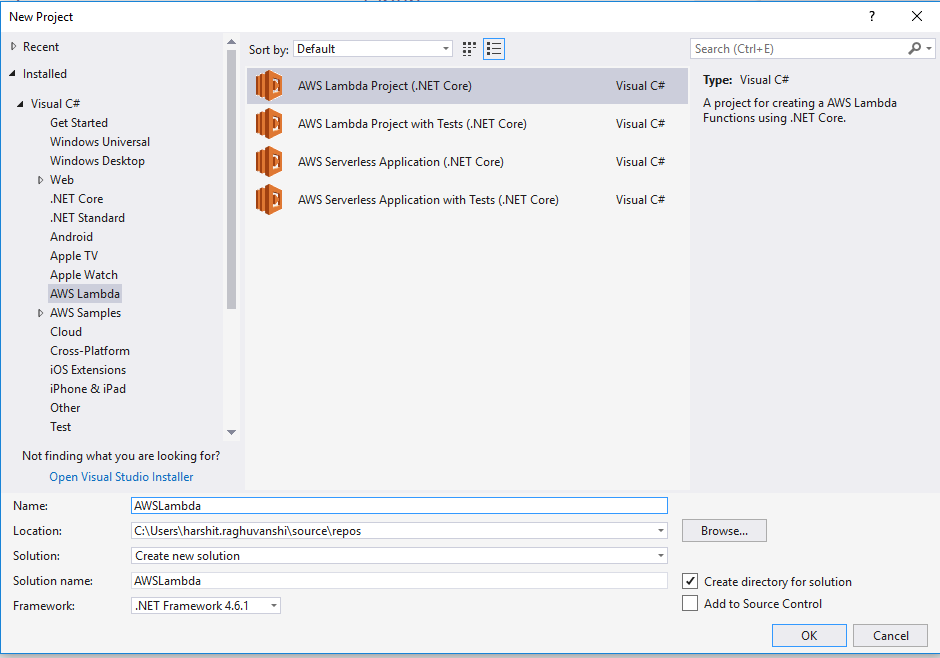
To write our Alexa skill, Firstly we should have the Lambda C# template, which is in the AWS Toolkit for Visual Studio. Then open up Visual Studio & select the AWS Lambda Project (.NET Core) from the AWS Lambda.
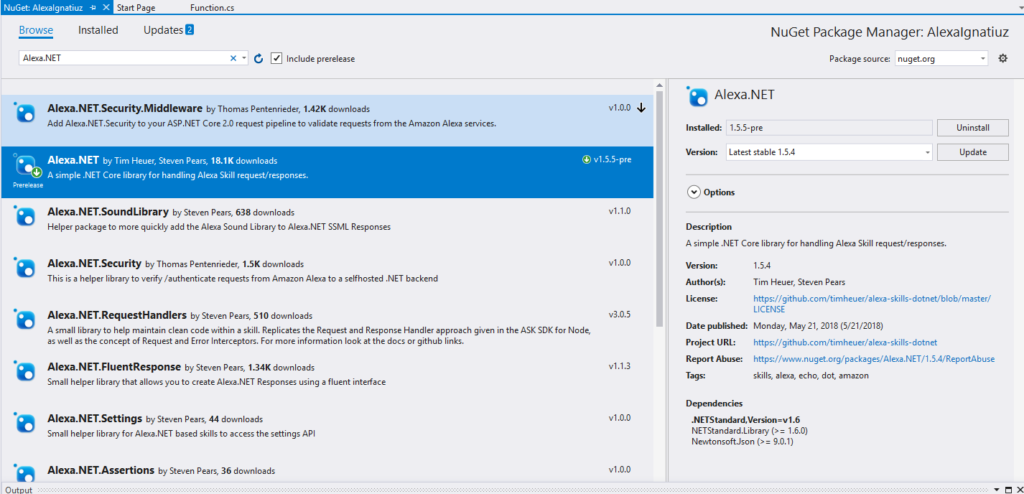
Create your new project. Select Empty Function & click Finish. After that add helpful nuget packages for the project. Open Manage NuGet Packages and go to Browse.Type Alexa.NET package and installed it.
2.1 Working with the Alexa request/response:-
Open the Function.cs class, inside that there is a FunctionHandler and we need to change the method handler to:
public string FunctionHandler(SkillRequest input, ILambdaContext context)
So we have the SkillRequest object, we can understand the data and know about how our skill should respond. Alexa skills contain a few request types that we’ll need to look at. In this scenario we want to handle the IntentRequest types. Firstly need to get out our parameters from the slots and then execute intent function. Now create response object which is going to be a simple plain-text speech response. Using JSON.NET we can also serialize it into the correct format.
Now, we have covered first part of a blog and learnt from creating an AWS account to writing an Alexa Skill.
In the second part of a blog, we will cover last two steps as we discussed at the beginning of a blog.


[…] have covered previous blogs related to Alexa skill customization. In the first part of the blog Customization of Alexa skill I we have gone through to Create an AWS account & Set up Visual Studio for lambda services and […]