
Low-code/no-code platforms allow business users and professional developers to create, verify, and deploy software applications significantly more swiftly and cost-effectively. The main advantage of low-code or no-code platforms is the speed at which applications can be built and delivered to workers and customers. Technical and non-technical users can build apps with low-code no code solutions that streamline their workflow, regardless of their company’s size.
Low Code/ No Code development platforms help firms become more efficient and flexible. It offers following features:
- Developing an event-specific app is an excellent approach to keep participants interested. Delegates can use conference apps.
- You can create an app to store and manage staff purchase requests, as well as to simplify and even automate approvals, instead of employing email or physical documentation to request products.
- Apps can help new staff get up to speed more quickly. You might also make an app to assign, track, and manage staff training exercises.
Microsoft Power Platform is an innovative platform that allows you to quickly create Teams-compatible apps with low-code no code features. Low-code and no-code development platforms offer a number of advantages.
- Productivity enhancements
- Cost savings
- Agility in business
- Effective Management
You will be able to use Microsoft PowerApps to motivate your teams to build low-code no-code apps which automate processes, solve business problems, and make your business more dynamic and efficient.
Microsoft PowerApps are a suite of apps, services, connector and data platform that provides a rapid application development environment apps for your business needs.
Today, in this blog we are going to learn how to “create” or “add multiple input text field dynamically” for item gallery without writing any code or without using any scripting language.
You can create multiple fields dynamically using of its own functions and some of your logic.
So let’s start:-I am assuming that you have to create multiple text box for each month for a given period of time, along with start and end date.
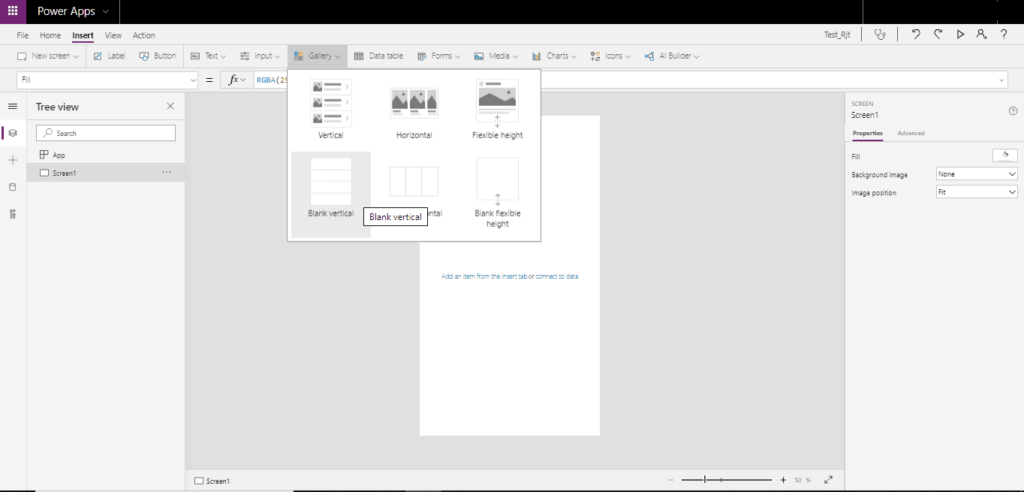
You need to first create a canvas app in powerApps and add “Gallery” by selecting from gallery template.
Now create some collection with some data using powerApps function and write in a “onStart “section by clicking on App Start component. you can use your own data from any data source like SQL or CDS entities.
Clear(MonthBase); Clear(MonthSortBase);
ClearCollect(userItem,Table( {Id:1,User:”User1″,StartDate:”1/8/2019″,EndDate:”31/12/2019″},
{Id:1,User:”User2″,StartDate:”1/1/2020″,EndDate:”31/5/2020″},
{Id:1,User:”User3″,StartDate:”1/4/2020″,EndDate:”24/11/2020″}));
ForAll( Calendar.MonthsLong(), Collect(MonthBase, {MonthID:Max(MonthBase,MonthID)+1 , month:Value}));
ForAll( Calendar.MonthsShort(), Collect(MonthSortBase, {MonthID:Max(MonthSortBase,MonthID)+1 , month:Value}));
Now add “userItem” collection on Item to show data in the gallery.

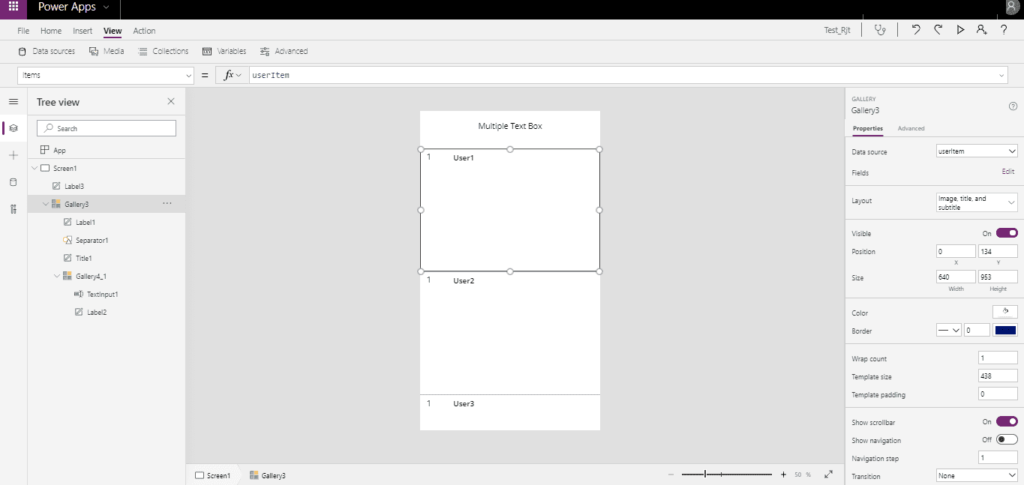
Then add an another gallery inside the gallery with one text filed.
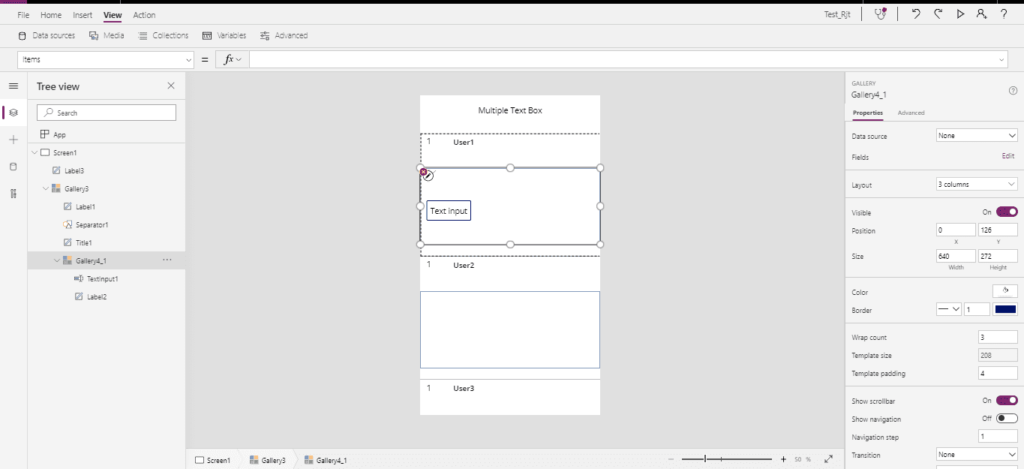
Now write your logic on “OnVisible” Section by clicking on screen component for showing an input text field for multiple time.
Clear(MonthTarget);
Clear(UserDataCollect);
ForAll(
userItem,
Collect(
UserDataCollect,
{
userId: userItem[@Id],
StartDate: userItem[@StartDate],
EndDate: userItem[@EndDate],
DateDiff: DateDiff(
DateValue(userItem[@StartDate]),
DateValue(userItem[@EndDate]),
Months
) + 1
}
)
);
ClearCollect(
colInner,
MonthBase
);
UpdateContext({vOuterMax: CountRows(MonthBase)});
ForAll( UserDataCollect,
ForAll( MonthBase,
ForAll( colInner,
Collect( MonthTarget,
{
UserId: UserDataCollect[@userId],
RowId: colInner[@MonthID] + (vOuterMax * (MonthBase[@MonthID] – 1)),
monthId: If (
Month(DateValue(UserDataCollect[@StartDate])) + ((colInner[@MonthID] – 1)) <= 12,
Month(DateValue(UserDataCollect[@StartDate])) + ((colInner[@MonthID] – 1)),
Month(DateValue(UserDataCollect[@StartDate])) + ((colInner[@MonthID] – 1) – (12)) ),
monthName: If(
Month(DateValue(UserDataCollect[@StartDate])) + ((colInner[@MonthID] – 1)) <= 12,
LookUp( MonthBase, MonthID = Month(DateValue(UserDataCollect[@StartDate])) + ((colInner[@MonthID] – 1)), month ),
LookUp( MonthBase, MonthID = Month(DateValue(UserDataCollect[@StartDate])) + ((colInner[@MonthID] – 1) – (12)),month)),
year: If( (Month(DateValue(UserDataCollect[@StartDate])) + ((colInner[@MonthID] – 1)) <= 12), If( Max( MonthTarget,year) >= Year(DateValue(UserDataCollect[@StartDate])),
Max(MonthTarget,year),Year(DateValue(UserDataCollect[@StartDate]))),
If(Month(DateValue(UserDataCollect[@StartDate])) + ((colInner[@MonthID] – 1) – (12)) < 2, Max(MonthTarget,year) + 1,Max(MonthTarget,year))) } ) ) ); RemoveIf( MonthTarget, RowId > (DateDiff(
DateValue(UserDataCollect[@StartDate]),
DateValue(UserDataCollect[@EndDate]),
Months
) + 1)
);
)
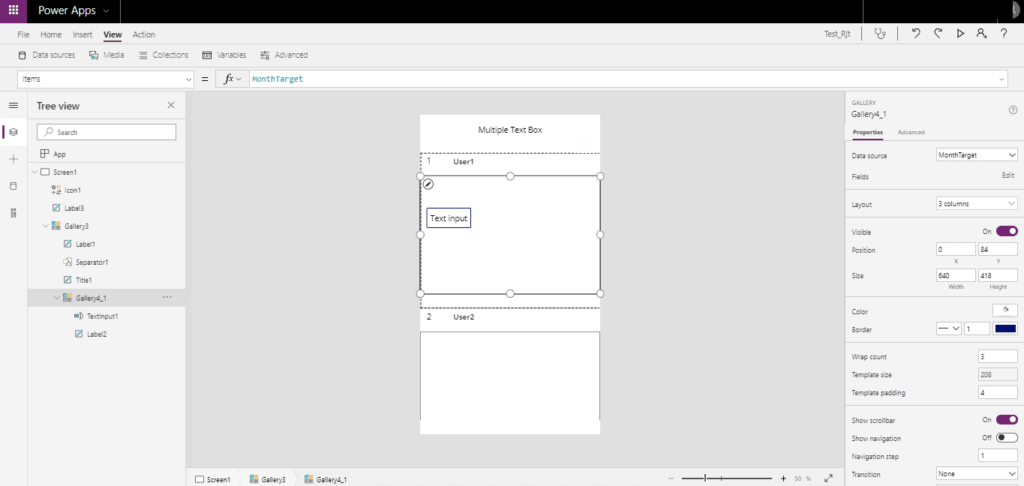
Then add collection name on nested gallery items to show the month field which are stored in the collection.

Save the app and click on run icon. You will see different text box for months.
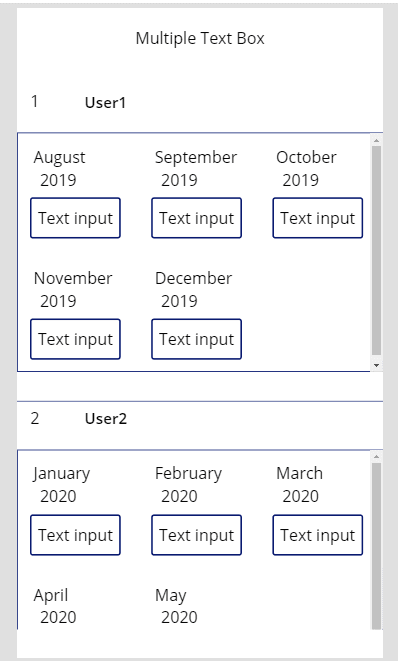
You can create any type of field dynamically like this without drag and drop or without writing scripting code, Just create a logic and build it for your app.
Conclusions
Ignatiuz’s Power Apps allows consumers to construct their own applications, usually for specialized business operations, while also giving expert developers an easy and speedy development path.
Microsoft’s PowerApps is quickly becoming a standardized low-code no code development platform of choice in the workplace. Contact us for more information on how we can support you in low code no code solutions with Microsoft Power apps.


Hello there! Would you mind if I share your blog with my zynga group?
There’s a lot of folks that I think would really enjoy your content.
Please let me know. Cheers
What’s up it’s me, I am also visiting this web site on a regular basis, this web site
is genuinely nice and the visitors are truly
sharing pleasant thoughts.
Very good written article. It will be helpful to anyone who employess it, as well as myself.
Keep up the good work – can’r wait to read more posts.
I got this web page from my friend who informed me about this website and now this time I am visiting this
website and reading very informative posts here.
I visited a lot of website but I think this one has got
something extra in it.