This blog will show integration of Selenium with Cucumber step by step and JUnit reports.
Selenium is an automated testing suite for automating web applications. It is an open-source tool that supports different languages like Java, Python, C#, Perl, Ruby and different browsers (Chrome, Firefox, etc).
Cucumber is a software tool that supports BDD (behavior-driven development) which is used for creating test-cases in plain text using Gherkin language. So anybody, either technical or business user, can understand the behavior of the application easily. It is an open-source tool and supports different languages like Java, Groovy, etc.
Below are some primary keywords to write test-case in Gherkin language:
- Feature – keyword where the gherkin file begins. It contains a description of the test-case.
- Scenario – Each feature file may have multiple scenarios and each scenario consists of one or more steps.
- Given – For defining the pre-conditions of the test case.
- When – For defining the operation performed by the user.
- Then – To view output, use “Then” keyword in the .feature file.
- And – For writing multiple steps of Given and When keywords, can use “And” keyword in the .feature file.
- But – For adding negative conditions which will not happen in the test case.
Let’s start integrating Selenium with Cucumber by following steps:
- Create a new Java Project in Eclipse IDE.
- Download selenium and cucumber jar files and add them in the Java build path.
https://jar-download.com/artifact-search/selenium-server
https://jar-download.com/?search_box=cucumber-java - Download cucumber eclipse plugin from the eclipse marketplace.
- After adding jar files, Create a new folder and create a .feature file in that.
- Now, let’s create a test-case scenario in the feature file using Gherkin language.
Feature: Facebook Login
Scenario: Login Verification
Given Open the Firefox and launch facebook
When Enter the Email and Password
When Enter the Email and Password
Then Click on Login button - Now, Create a new package and create a “Runner” class in that (src>package>class)and write below code in that.
package Test_Runner;
import org.junit.runner.RunWith;
import cucumber.api.CucumberOptions;
import cucumber.api.junit.Cucumber;
@RunWith(Cucumber.class)
@CucumberOptions(features=”Features”,glue= {“Step_Definition”})
public class Runner { } - Create another package and create a “Steps” class (src>package>class) and write below code in that.
package Step_Definition;
import org.openqa.selenium.By;
import org.openqa.selenium.WebDriver;
import org.openqa.selenium.firefox.FirefoxDriver;
import cucumber.api.java.en.Given;
import cucumber.api.java.en.Then;
import cucumber.api.java.en.When;
public class Steps {
WebDriver driver;
@Given(“^Open the Firefox and launch facebook$”)
public void open_the_Firefox_and_launch_the_application() throws Throwable{ System.setProperty(“webdriver.gecko.driver”, “E:\\Softwares\\geckodriver.exe”);
driver= new FirefoxDriver(); driver.manage().window().maximize(); driver.get(“https://www.facebook.com/”);
}
@When(“^Enter the Email and Password$”)
public void enter_the_Username_and_Password() throws Throwable{ driver.findElement(By.id(“email”)).sendKeys(“abc@xyz.com”); driver.findElement(By.id(“pass”)).sendKeys(“abc@123”);
}
@Then(“^Click on Login button$”)
public void Reset_the_credential() throws Throwable{
driver.findElement(By.id(“loginbutton”)).click();
driver.close();
}
}
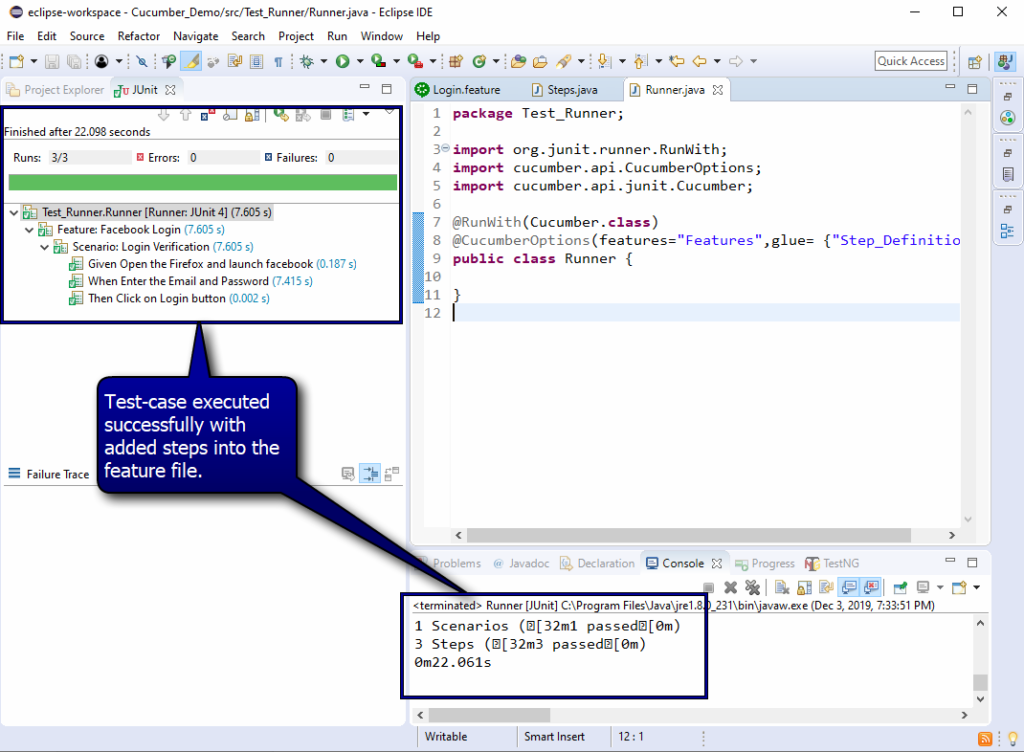
- Once all the mentioned setups are done, run the JUnit test to view the report.