Hi Folks, In this blog we will learn about how we can use the child control event in the listview items, Since there are many scenarios occurred where we required to have either a Xamarin Forms checkbox or a Xamarin Forms button for each item in the list view, achieving the same with Android or xamarin android is quite easy but in xamarin forms many newcomers could not get proper flow for achieving the same functionality. And, that’s why we have listed out the steps you will need to follow to configure Xamarin Forms CheckBox.
We also offer more products and services like IT Change Management.
Steps to Configure Xamarin Forms CheckBox

–> Let’s start with implementing a Button for each item in Xamarin Forms Listview click event. To implement Xamarin Forms Listview click event, First of we all we need to create a custom view cell for the item(child) view that list may contain like below:
<ListView x:Name=”Listview” VerticalOptions=”FillAndExpand”>
<ListView.ItemTemplate>
<DataTemplate>
<ViewCell>
<StackLayout Orientation=”Horizontal”>
<Label Text=”{Binding ItemName}” HorizontalOptions=”StartAndExpand” FontSize=”30″></Label>
<Button Text=”Click Me” CommandParameter=”{Binding.}” Clicked=”ButtonClicked”></Button>
</StackLayout>
</ViewCell>
</DataTemplate>
</ListView.ItemTemplate>
</ListView>
Here in above xaml code, we created a Stack layout with the label and a button,
button has the property set for the Command parameter and Clicked. Clicked takes the reference for the method in our code behind which will get called when user taps on it, On the other hand, Command parameter will attach the current Bounded context of ItemSource of this list view with this button such that in the Clicked function it will get available as the Event Arguments.
Below are the usage of retrieving the value of the current bound item with that particular button:
Create the below method inside your code behind:
Public async void ButtonClicked(object sender, System.EventArgs e)
{
var b = (Button)sender;
var ob = b.CommandParameter as <your model class name>;
if (ob != null)
{
// retrieve the value from the ‘ob’ and continue your work.
}
}
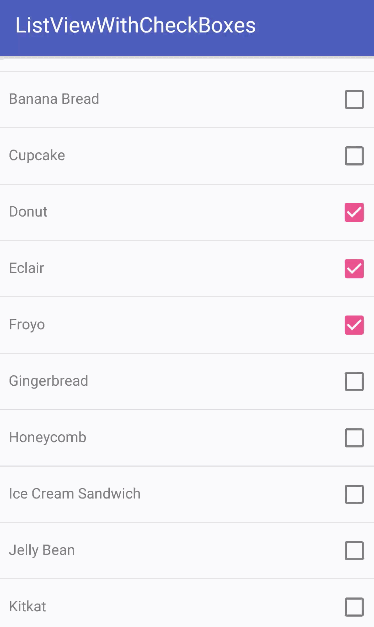
–> Now that you know how to implement Xamarin Forms listview click event, let’s take example of using Xamarin Forms Listview with checkbox in the same way:
Go through the below-mentioned steps to understand how to implement Xamarin Forms listview with CheckBox.
- Install the Xamarin.Forms.InputKit Nuget package in you Android and IOS project
- Now declare the xmlns directory for the content page like below:
xmlns:input=”clr-namespace:Plugin.InputKit.Shared.Controls;assembly=Plugin.InputKit”
- Now use it like below anywhere in your xaml:
- <input:CheckBox Text=”<name>” Type=”Check” Color=”White” BoxBackgroundColor=”Black” TextColor=”Black” HeightRequest=”40″ CheckChanged=”checkbox_CheckChanged” BindingContext=”{Binding .}”/>
Below is the full example with Listview View cell in Xamarin Forms
<ListView IsVisible=”true” x:Name=”ListView” RowHeight=”50″ CachingStrategy=”RecycleElement” SeparatorColor=”Transparent” BackgroundColor=”Transparent”>
<ListView.ItemTemplate>
<DataTemplate>
<ViewCell>
<input:CheckBox Text=”{Binding Name}” Type=”Check” Color=”White” BoxBackgroundColor=”Black” TextColor=”White” HeightRequest=”40″
CheckChanged=”checkbox_CheckChanged” BindingContext=”{Binding .}”/>
</ViewCell>
</DataTemplate>
</ListView.ItemTemplate>
</ListView>
Now we are ready to use it in the code behind below is the example of how we can achieve the click and listview with checkbox state changed event in cs. The process to achieve listview with CheckBox state changed event is cs is relatively simple with the below-mentioned code.
Create the below method in your code behind which will get called whenever any checkbox in the ListView gets updated on tap by the user.
private void checkbox_CheckChanged(object sender, EventArgs e)
{
var checkbox = (CheckBox)sender;
var ob = checkbox.BindingContext as <your model name>;
if (ob != null)
{
AddOrUpdatetheResult(ob, checkbox);
}
}
private void AddOrUpdatetheResult(<your model name> ob,CheckBox checkbox)
{
// Check if a particular checkbox is checked or not with below if
if(checkbox.IsChecked){
// create your logic further as per the flow of your app and the data of the particular item in Listview can be fetched from the //‘ob’
}
}
In the above example the process of attaching the current object from the source known as Xamarin Listview binding remains same like –CommandParameter=”{Binding .}”
Link for the Nuget package used in the above example: https://github.com/enisn/Xamarin.Forms.InputKit
Xamarin Forms vs Xamarin Native: What’s the Difference?
Many people, when they start working on a project, find it difficult to decide whether they should opt for Xamarin Native or Xamarin Forms. Let’s understand the difference between the two.
Xamarin Forms helps you create cross-platform software, while Xamarin Native helps create separate applications for each different platform with Xamarin. Android and Xamarin.iOS libraries.
Although Xamarin Native is considerably more resource-intensive, it is generally chosen over Xamarin Forms by a majority of people. One of the causes for this is that apps created using Xamarin Native are more efficient. Also, unlike Xamarin.Forms, the size of the application obtained with Xamarin.Android and Xamarin.iOS is usually smaller. Another benefit of using Xamarin Native is that the user interface of an application should ideally feel very native. When creating the UI for a platform, the two common mobile platforms are iOS and Android. Given this, Xamarin Native offers an obvious advantage over Xamarin.Forms.
That said, Xamarin Native might not always be the right choice. For instance, if the customer or organization has limited time and funds to put towards developing a mobile application, Xamarin.Forms may be the better choice. This does not, however, mean that the end product created using Xamarin.Forms will be of inferior quality. Xamarin Forms also offer more simplicity in terms of scaling and maintenance that may be required in the future. Xamarin.Forms technology is also almost continuously being developed and there is a large community that can provide readymade components.
The process to achieve listview with CheckBox state changed event is cs is relatively simple with the below-mentioned code.
Xamarin is a platform that is used to build modern applications for Windows, Android, and iOS. The key benefit of Xamarin is that it helps developers share nearly 90% of the applications they build across platforms. This helps developers either reuse the existing application code or write the code in a single language, but still achieve the native look, feel, and performance on every single platform that is created. As a result of this Xamarin helps developers save a significant amount of time
Who is Xamarin meant for?
Xamarin forms is an ideal choice for developers who would like to:
- Share business logic, test, and code across different platforms
- Write applications in C#, such that it can be shared across platforms, with Visual Studio.
What does Xamarin do?
Xamarin offers a number of important features such as:
- Cross-platform support: Xamarin offers cross-platform for Windows, Android, and iOS.
- Integrated Development Environment: Xamarin uses a modern Integrated Development Environment that includes features like a comprehensive project template library, code auto-completion, integrated source control, and solution management system, among other things.
- Modern language constructs: All applications in Xamarin are written in C#, which offers a significant amount of improvement over languages like Java and Objective-C.
- Can invoke C++, C, Java, and Objective-C libraries: Xamarin provides you the facility to directly invoke C++, C, Java, and Objective-C libraries, thus allowing you to use a wide range of third-party code.
What are Xamarin Forms?
Xamarin Forms is a UI framework that helps developers create Xamarin.Android, Windows, and Xamarin.iOS applications through a shared codebase. The user interface on the platform is rendered as native controls. Read on to know how you can configure Xamarin Forms CheckBox.
Summary
Both Xamarin Forms and Xamarin Native can make a beneficial choice. The choice will ultimately depend on what you expect from the software. If you are still unsure of which software to go ahead with or don’t have the required expertise to work with the framework, get in touch with our team of experts at Ignatiuz.