
Generally speaking, Active Directory (AD) consists of a database application that manages a company’s user accounts, passwords, and other details about its users (such as their roles). All user accounts are stored in this repository. It is typical to add users to a SharePoint group via a turnkey solution such as Robotic Process Automation with Power Automate or any other customized solution.
By using the Active Directory actions within Power Automate, users can perform all the necessary operations in Active Directory servers. These actions allow users to create, modify, and manage Active Directory users, groups, and objects. Microsoft 365’s SharePoint makes it easier to share and collaborate on content with external users.
SharePoint groups serve as a means of managing access to sites within the SharePoint environment. Every SharePoint site has three security groups:
- Visitors have access to the content in a read-only manner.
- A member is a person who has access to Add/Edit/Delete the content.
- Owners are people who have Full Control access to the entire site.
Adding a new user to a SharePoint site: Following the completion of the Microsoft form, we can begin building the Power Automate flow that will send an email invitation and grant access to the external user. External sharing is a SharePoint Online feature that allows users inside your organization to share content with people outside your organization. The list of guests you can invite to SharePoint sites does not have a limit, with SharePoint online limiting documentation.
To add any user or to share the site with users, we need to go and share the site with the users manually. It is good until and unless we need to share it with a limited number of users.
But it is not possible to share the site and add the users on the fly.
We can add Active Directory users to the SharePoint group.
This blog will guide you how this can be easily done by using Power Automate in integration with SharePoint and Azure Active directory.
Let’s get started, but first, read what is Microsoft power platform|power automate?
Microsoft power platform is one of the exciting technologies, which can prevent several challenges. The power platform of Microsoft is a collective term for three vital products of Microsoft, and they are:
- Power BI
- Power Apps
- Power automate
Power automation is also known as flow. These products of Microsoft are created to help people manipulate, surface, automate, and analyze data. Along with that, these products are used with office 365 and dynamics 365. And businesses are also using these products with third-party apps and other Microsoft services.
On the other hand, the Microsoft power platform is the strength of the common data service or CDS that renders a unified and simplified data schema to inter-operate applications and services.
If we analyze the importance of the power platform (PP), then it has made many excellent changes in data analysis.
In this digital age, businesses are reliant on data, and the amount of data is increasing day-by-day. Prior to the power platform(PP), IT/Development teams are responsible for data analysis, app creation, or automation. At that time, staff outline their requirements and aims and send them to their IT department, and wait for their approval and corollary. This process was time-consuming and costly. It also takes weeks to render optimal results.
This is why people find the power platform (PP) so exciting and easy-to-implement. MS power platform uses three technologies to enable data democratization and allow businesses to do more with their data, that too, without coding knowledge. Yes, PP does not allow the flexibility of custom coding, and fortunately, Microsoft power platform consultant provides an easy method to create, automate, or analyze data. And the three technologies that the power platform of Microsoft use are:
- Power Apps
- Power Automate
- Power BI
Now, let’s know why we need to create a Power Automate (Flow)?

Add a trigger action item for HTTP request (Post), as we are going to call this Power Automate by using JavaScript/Typescript in a SPFX form.
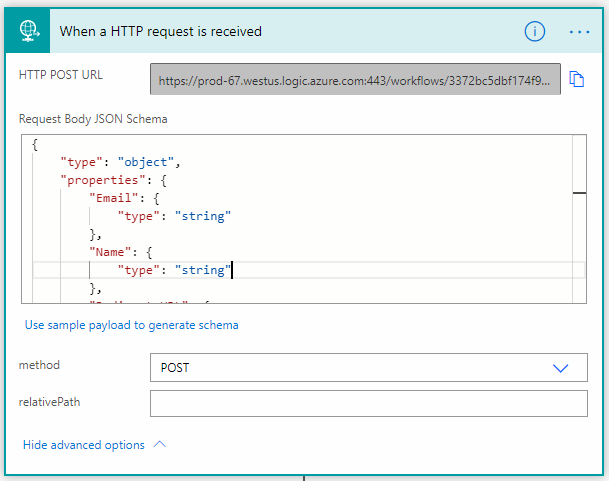
We added this Json Body schema in this post request
{
“type“: “object”,
“properties“: {
“Email“: {
“type“: “string”
},
“Name“: {
“type“: “string”
},
“Redirect URL“: {
“type“: “string”
},
“Message“: {
“type“: “string”
},
“Group“: {
“type“: “string”
}
}
}
Email: User email
Name: User name
Redirect URL: URL to navigate the User to the site, and adds the user in to SharePoint group of this site
Message: custom message to be send in the invitation email
Group: SharePoint group name (in which we want to add the external user)
Now need to add the Action item for Azure AD as “Get User”
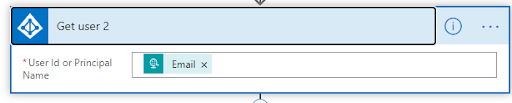
We will pass the Email into this action item which we are receiving from our Http request action above.
This Action item will check the user with given email in Azure Active Directory. if a user with the same email exists, we can move ahead in flow else flow will give error for no user.
Now after this step I am adding a delay action item, to just make sure the user details received properly before proceeding further. (See in below image)
After delay we are adding Action item “Send an HTTP request to SharePoint”
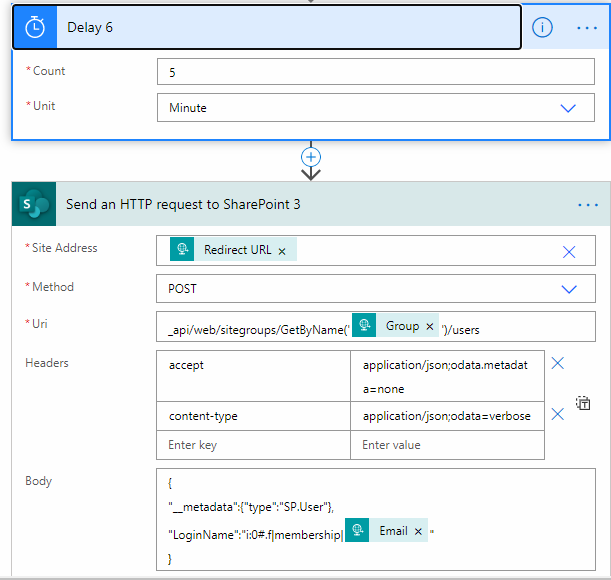
This “HTTP request to SharePoint” can be used to add the User into the SharePoint group, doing this the user get the permission as per the group permission
Site Address : Site URL which we pass in first action item (Http request) from JavaScript/Typescript
Method : Post
URI : _api/web/sitegroups/GetByName(“Group name”)/users
Or
URI : _api/web/sitegroups(group id)/users (group id = id which SharePoint defines for the individual group)
Header:
Key: accept value: application/json;odata.metadata=none
Key: content-type value: application/json;odata=verbose
Body:
{“__metadata”:{“type”:”SP.User”},
“LoginName”:”i:0#.f|membership|Mail”}
(Mail = email that we get from the output of Get User trigger )
And here we are done, User will be added to the specified SharePoint group.
In addition if you want to send the notification to the newly added user, we can add on one more action item at the end.
We can add any custom subject and body text in this action item. This will send the email to the User with the given subject and body
Final Thoughts: After learning about the key advantages of a Sharepoint group, Ignatiuz’s features are sure to interest you, for further details contact us.