
A core feature of Microsoft’s Power Platform, Power Automate is a cloud-based workflow engine that automates process automation with low code. Microsoft Flow, earlier known as Business Process Management software, allows organizations to monitor their processes via networked data sources, and constructs streamlined applications based on their business rules.
Power Automate automates repetitive tasks such as file synchronization, receiving notifications, collecting data, and creating reports for entrepreneurs and employees to improve operating efficiency.
The demand for organizations to share their Office 365 or custom applications with external users has grown significantly over the last few years. It is now easier to share these apps while keeping your data safe with Azure Active Directory, whether you are a Business – to – business (B2B) or Business – to – consumer (B2C) client.
To add any external user or to share the site with external user, we need to go and share the site with the external users manually. It is good until and unless we need to share it with limited number of users.
But it is not possible to share the site and add the external users on the fly.
This blog will guide you how this can be easily done by using Power Automate in integration with Azure Active directory.
Let’s get started
First we need to create a Power Automate (Flow)

Add a trigger action item for HTTP request (Post), so that this flow can be triggered from any type of application. I am going to call this Power Automate by using JavaScript/Typescript in a SPFX form on SharePoint Online.
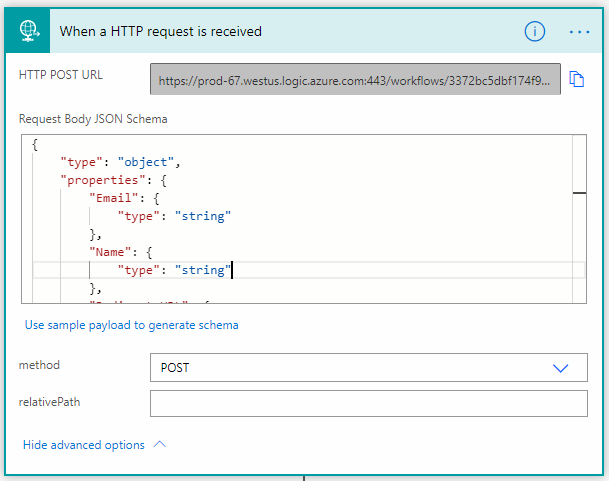
We added this Json Body schema in this post request
{
“type“: “object”,
“properties“: {
“Email“: {
“type“: “string”
},
“Name“: {
“type“: “string”
},
“Redirect URL“: {
“type“: “string”
},
“Message“: {
“type“: “string”
},
“Group“: {
“type“: “string”
}
}
}
Email: User email
Name: User name
Redirect URL: URL to navigate the User to the site, and adds the user in to SharePoint group of this site
Message: custom message to be send in the invitation email
Group: SharePoint group name (in which we want to add the external user)
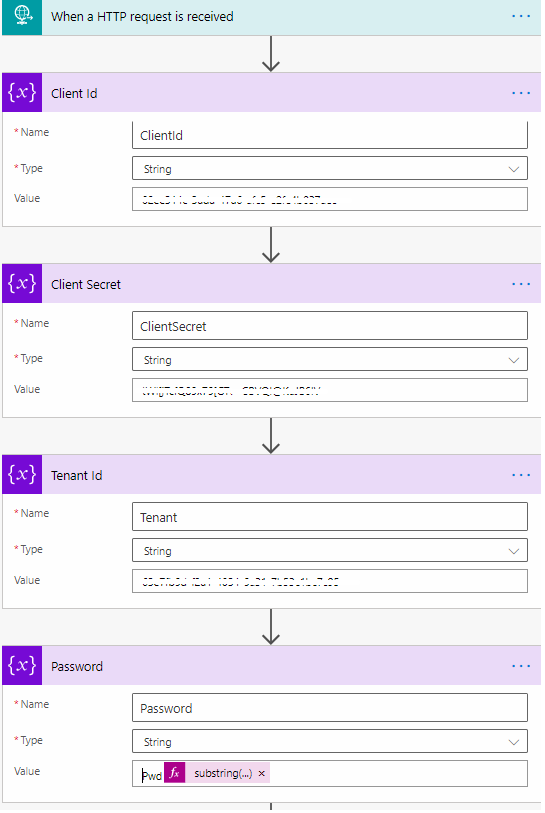
Then add the action item “Set Variable” to add
- Client Id
- Client Secret
- Tenant Id
Values for these above three, you can get from the Azure App. Once we do the App Registration in Azure portal it will give these values.
VAdded another action item to generate the random password
See in below image
Add HTTP action trigger post method to generate the access token
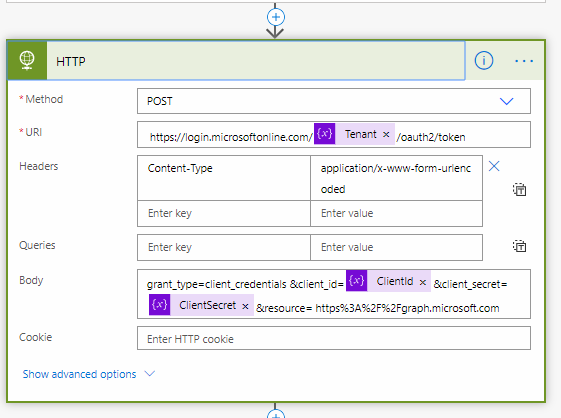
URL : https://login.microsoftonline.com/Tenant variable/oauth2/token
Header:
Key: content-type value: application/x-www-form-urlencoded
Body:
grant_type=client_credentials &client_id=Client Id variable&client_secret=ClientSecret variable&resource= https%3A%2F%2Fgraph.microsoft.com
Now add the Action item to parse the Json output of above action
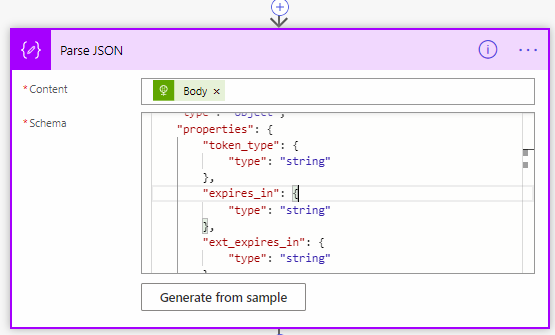
Schema sample:
{
“type“: “object”,
“properties“: {
“token_type“: {
“type“: “string”
},
“expires_in“: {
“type“: “string”
},
“ext_expires_in“: {
“type“: “string”
},
“expires_on“: {
“type“: “string”
},
“not_before“: {
“type“: “string”
},
“resource“: {
“type“: “string”
},
“access_token“: {
“type“: “string”
}
}
}
Once we get this Access token, we can add the external user in the active directory.
To invite the external user on Active directory we are using Microsoft graph api of invitation
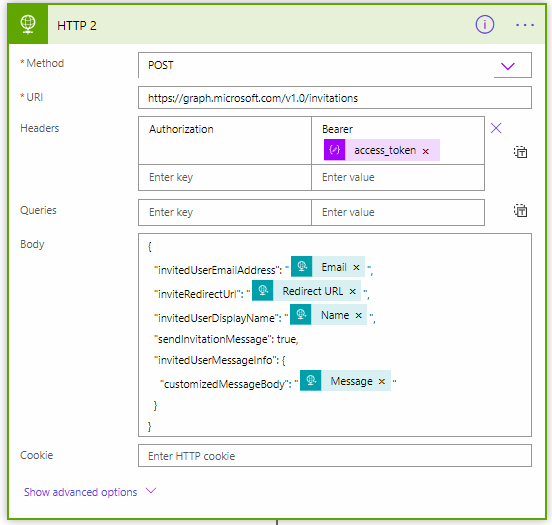
URL: https://graph.microsoft.com/v1.0/invitations
Header: Key : Authorization Value: Bearer AccessToken (token value from Above json Parse)
Body: {
“invitedUserEmailAddress”: “Email”,
“inviteRedirectUrl”: “Redirect URL”,
“invitedUserDisplayName”: “Name”,
“sendInvitationMessage”: true,
“invitedUserMessageInfo”: {
“customizedMessageBody”: “Message”
}
}
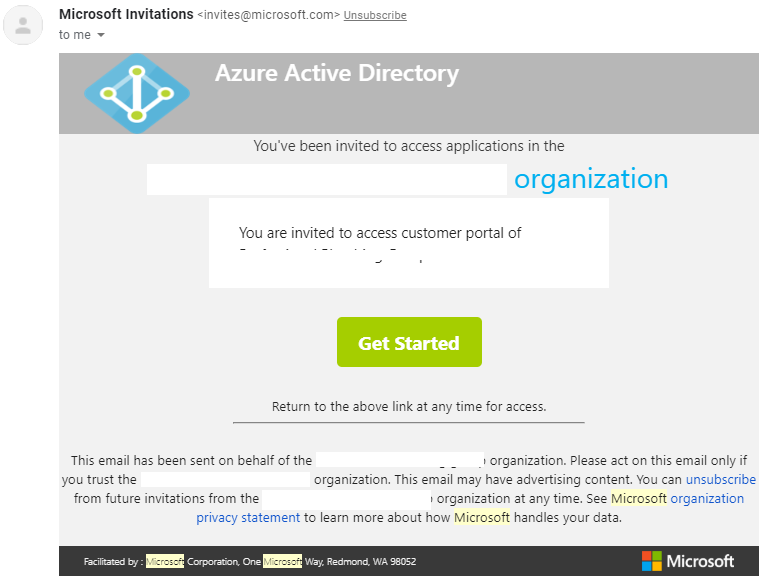
From this the External user will get the email for invitation. Something similar as shown in below image
This process can be automated easily using Power Automate.