The SSIS components for Smartsheet project management tool make it simple to back up Smartsheet data to SQL Server.
Using SQL Server as a backup for crucial corporate data is a must-have safeguard against data loss. By using Smartsheet tool, the data is backed up to SQL Server, it is easier for business users to link it to services like reporting, analytics, and more.
The SSIS package is an ETL (Extract-Convert-Load) processing tool that may be used to not only import data into a database, but also to transform, filter, and group data, among other things.
Inserting data into a database table can be difficult and time-consuming. Especially now, as databases continue to grow in size. Depending on the source file type and data arrangement inside, automated data importation can be done in a variety of ways.
The load Data wizard in SQL Server Management Studio is the simplest way to import data into a SQL database. The user can choose the source file and the destination table to import the data by following the wizard’s stages. However, importing data in this manner restricts the user’s ability to perform more sophisticated activities involving various types of data and several files.
The SSIS packages provide a solution to this type of issue. The SSIS package is an ETL (Extract-Convert-Load) processing tool that may be used to not only import data into a database, but also to transform, filter, and group data, among other things.
Smartsheet Software is a great tool to manage projects and tasks. Many times, user needs to export data from SQL Server and import into Smartsheet. Sometimes it is a regular job to import to smartsheet from SQL server tables.
To reduce the manual work and make it automated, we can use c# Smartsheet SDK and SSIS package.
First create a SSIS package and create a variable of Object type for data table. I have created a variable as dt.

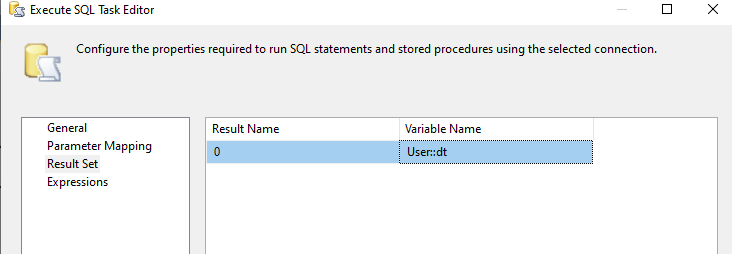
Now, Drag a “Execute SQL Task” to get data from SQL. Create a connection with SQL Server and set up connection information to the “Execute SQL Task”. Thereafter, Write a query in SQLStatementSource property. Then right click the “Execute SQL Task” and click Edit to get task editor. From the left navigation in the task editor, select Result Set. Usually, you will find it empty. So please click “Add button” to add to the result set. Give 0 in the “Result Name” column. Give name of variable under variable name column along with prefix “user” because it is user defined. Now click OK.

By doing the above exercise, We are setting up result set, because it will be required to store data into data table, further to pass data to “Script Task”.
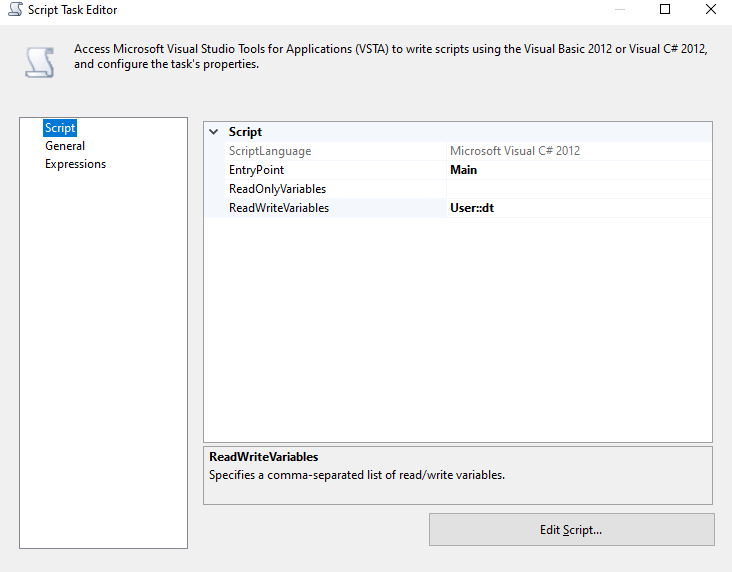
To continue ahead, Now drag the script task from toolbox. Right click the script task and click edit. You will get three options to select from left navigation of edit box. By default, the first option “Script” is already selected. Now Go to “ReadWriteVariables” section in the right and put the name of variable we defined in previous step.

The above step will help to pass all the data to the script which we are going to write. Now click “Edit Script” button. This will open the code in another visual studio instance.
Further, In the solution explorer, under reference section, add reference of below libraries which is provided by C-Sharp Smartsheet SDK.
- smartsheet-csharp-sdk.dll
- RestSharp.dll
- NLog.dll
- Newtonsoft.Json.dll
Note: Please ensure that above assemblies are installed to GAC.
Once references are added, import the namespace we will be using as below:
using Smartsheet.Api;
using Smartsheet.Api.OAuth;
using Smartsheet.Api.Models;
Now we can use Smartsheet object to connect and insert data into smartsheet. All you need is Smartsheet ID and Smartsheet API Token. Below is the code:
string smartsheetAPIToken = “xxxxxxxxxxxxxxxxxxxxxxxxxxxxxxxxxxxxx”;
long sheetID = xxxxxxxxxxxxxxxxx; //Smartsheet ID
Token token = new Token();
token.AccessToken = smartsheetAPIToken;
SmartsheetClient smartsheet = new SmartsheetBuilder().SetAccessToken(token.AccessToken).Build();
Sheet sheet = smartsheet.SheetResources.GetSheet(sheetID, null, null, null, null,null, null, null);
//Code to read data table exported from SQL:
OleDbDataAdapter da = new OleDbDataAdapter();
DataSet ds = new DataSet();
DataTable dt = new DataTable();
//Loop through the data table.
foreach (DataRow dRow in dt.Rows)
{
//Code to read column name in Smartsheet i.e. Top Row
Row nRow = new Row();
foreach (Row topRow in sheet.Rows)
{
nRow = topRow;
}
//Define Cell and create object mapped with each column
Cell ID = getCellByColumnName(nRow, “ID);
Cell Name = getCellByColumnName(nRow, “Name”);
Cell Address = getCellByColumnName(nRow, “Address”);
Cell Email = getCellByColumnName(nRow, “Email”);
//Assign data to be inserted to each Cell
ID.Value = Convert.ToString(dRow[“ID”]);
Name.Value = Convert.ToString(dRow[“Name”]);
Address.Value = Convert.ToString(dRow[“Address”]);
Email.Value = Convert.ToString(dRow[“Email”]);
var cellsToAdd = new List();
cellsToAdd.Add(ID);
cellsToAdd.Add(Name);
cellsToAdd.Add(Address);
cellsToAdd.Add(Name);
//Add row to smartsheet
row = new Row.AddRowBuilder(true, null, null, null,
null).SetCells(cellsToAdd).Build();
smartsheet.SheetResources.RowResources.AddRows(sheetID, new Row[] { row });
}
Below is the function getCellByColumnName used in the above code.
public Cell getCellByColumnName(Row row, string columnName)
{
return row.Cells.First(cell => cell.ColumnId == columnMap[columnName]);
}
Once your done with the code. Please save and close the code window and click OK to script task. Now your SSIS package will look like below:
 Now execute the SSIS package. You will see that data will be inserted into the Smartsheet.
Let us know the next topic you want us to share the knowledge about. Happy browsing!
