
Xamarin extends the .NET platform(with other Microsoft tools & libraries) to provide us with 100% native mobile applications. Common code can be written in C# to create applications for Android, IOS as well as UWP.
Default calendars provided by different mobile platforms do not have a common UI and adding custom functionalities for each platform may become cumbersome. Thus, creating a common calendar becomes propitious & time-saving when adding multiple custom functionalities.
So, let’s start creating a custom calendar in Xamarin Forms that will remain common(UI & Code) for all mentioned mobile applications.
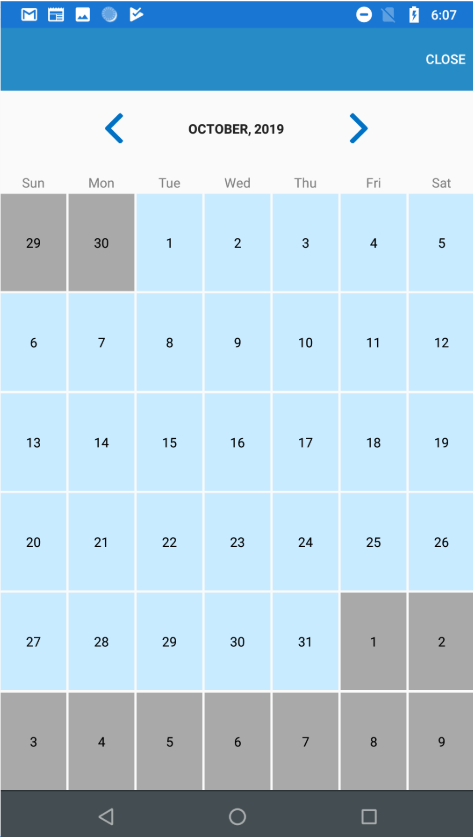
Here’s how it will look:
We will require some global variables to avoid silly mistakes and code redundancy, so create a file CalendarGlobalData.cs which will store all global variables required for the calendar.
The view to show UI will be divided into two parts:
- Top Area: To show date information and left/right movement buttons.
- Bottom Area: To hold our calendar.
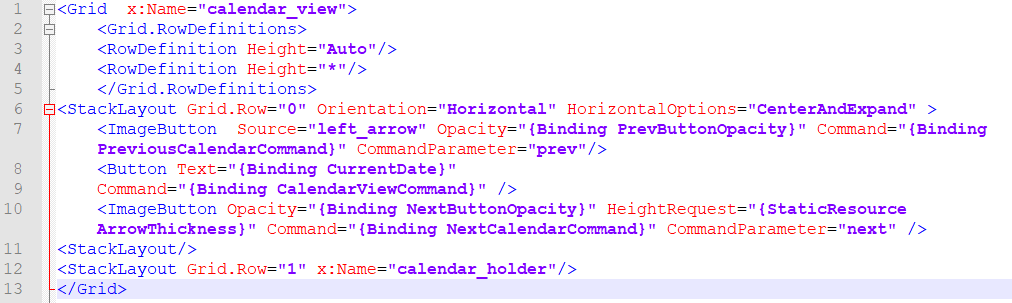
Let’s name this page CalendarView.xaml.
x:Name=”calendar_holder” will hold the calendar view.

The calendar will have 2 views:
- Year View: To show all months of the current year. It will hold Month boxes.
- Month View: To show days of the current month(Previous & Next month dates is also shown but will remain disabled). It will hold Day boxes.
To show days/months, we need to create boxes that will hold all the information regarding that day/month including the type of view. Each box will be a stack layout (easily maintainable). So, create CustomCalendarStackLayout.cs inheriting StackLayout which will act as days/months box. Add property DateTimeInfo of type DateTime in it.
As we are following the MVVM structure, it is always a good idea to create a ViewModel. Let’s name our calendar view model as CalendarViewModel.cs.
CalendarViewModel.cs will do the following work:
- Handle the click event of the next/previous button on the calendar.
- Enable/Disable the next/previous button on the basis of minimum & maximum date range provided.
- Will check, which views to open( Month or Year view ).
Now, we are done with all the setup. Let delve into the main logic. CalendarView.xaml.cs will hold all the calendar creation logic. Go through the below methods/steps to understand how the calendar creation logic will work:
- Constructor(CalendarView): It will take the calendar’s global data passed and accordingly decide the color, type of view,min-max date range etc. Then, bind the CalendarViewModel as BindingContext.
- MonthLayout & YearLayout: Two layouts will be created at the very start(for month & view) and they will remain constant.
These structures are combinations of CustomCalendarStackLayout(discussed earlier) only.
The layout will remain unchanged, only the values inside these layouts will change. This is done, to ensure that even for very low configuration mobiles, changing to another month or year, will not take time. As we have created a single structure, the updates are done in a split second. - MonthView & YearView: These methods will ensure that correct month dates(correct year’s months) are properly assigned to correct CustomCalendarStackLayout.
TapGestureRecognizers are added on CustomCalendarStackLayout on the basis of the Min-Max date range provided. Only a date that falls between Min-Max Range, will be assigned a TapGestureRecognizer. - DateSelected: Any date selected will invoke DateSelected method(attached through TapGestureRecognizer).
How to initiate our calendar?
You can add as many configurations as required through CalendarGlobalData().
The Verdict
Yes, you’ve created a complete calendar through shared code. The calendar looks native and is easy to maintain. The calendar we have created looks simple with not much functionality, but it can be extended in many powerful ways. It’s all up to you
Download the source code through GitHub repo: Click Here