
If we are using an image that is of less resolution than the container block, mage may look like dull or stretched.
For example:
 <div class="image-block">
	<img src="download.png">
 </div>

 <style type="text/css">
	.image-block {width:200px;height:200px;}
	.image-block img{max-height:100%;max-width:100%;}
 </style>
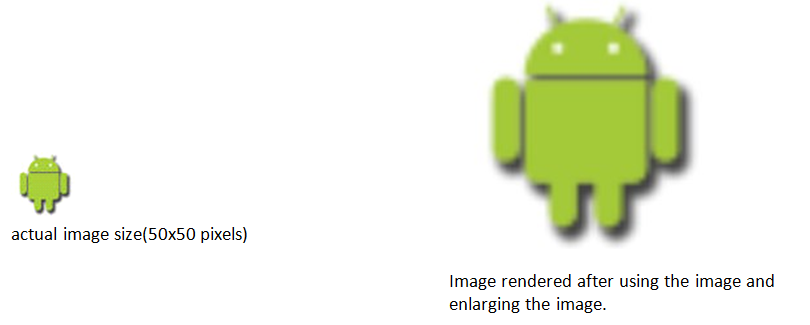
The image will look like this while rendering on browser when we enlarge the image. To make it more blocky and impressive we can use the CSS property “image-rendering”.
What is Image-rendering?
The “image-rendering” is a CSS property that tells browser about how to handle its image rendering. There are following properties of image rendering for different browsers
- image-rendering: auto;
- image-rendering: -moz-crisp-edges(only Mozilla supports)
- image-rendering: pixelated(only chrome 41 supports)
The image rendering only works when you enlarge or shrinks the image otherwise there will be no effect.
Image-rendering: auto is the default property that maximizes the appearance of the image.
Image-rendering: crisp-edges are the other property we can use it for Mozilla browser as image-rendering:-moz-crisp-edges. That preserves the contrast and edges in the image and does not smooth colors and blur to the image.
The image-rendering: pixelated is introduced by chrome that works on chrome 41.
Image-rendering: pixelated
The Chrome 41 introduces the property image-rendering: pixelated; it gives us more control over how browser should render an image that is scaled up. The image – rendering: pixelated property manages the pixels of image and renders in such a way that looks blockier and not distorted.
When we enlarge the image it uses the “nearest neighbor” algorithm to make the image blocky and not blurred. This method simply determines the “nearest” neighboring pixel, and assumes the intensity value of it. And make the image blockier and does not make the image blur.
I have given an example have a look at this:
 <!DOCTYPE html>
 <html>
	 <head>
		 <title>Example of Image rendering:pixelatedImage without pixelated property
			 <img class=”imagewithoutpixelated” src=”download.png”/>
		 </div>
		 <div class=”imagecontainer”>Image with pixelated property
			 <img class=”imagewithpixelated” src=”download.png”>
		 </div>
	 </div>
	 <style type=”text/css”>
		 .container{width:100%;height:100%;float:left}
		 .imagecontainer{width:200px;height:200px;float:left;margin:30px;}
		 .imagewithoutpixelated{width:200px;height:200px;}
                 .imagewithpixelated{width:200px;height:200px;image-rendering:pixelated;}
	 </style>
 </body>
 </html>
Here actual image is of 50x50px and it scaled up to 300x300px.

Here first image is without the image-rendering property and second image using the property image-rendering: pixelated.
Try with the above code and see the effect.
Source:
https://developer.mozilla.org/en/docs/Web/CSS/image-rendering.
http://updates.html5rocks.com/2015/01/pixelated.


