
Action Rule is the most frequently used Rule in InfoPath forms where you want to perform any action on control of the form or on form load or want to submit the data. Also, on firing the action, you can show the Validation Error message. Formatting Rules specify the format for the SharePoint InfoPath Form’s control. InfoPath form automatically validates the data you entered and if the required condition does not get the match, it does not allow to submit the form. Action Rules can be fire on any button’s click or by “Form Submit” option.
Following actions can be performed by the Action Rule:
- Switch views: “Switch views” option allows moving from one form to another form of the same instance of the InfoPath form.
- Set a field’s value: Using the “Set a field’s value” option, you can assign any static or dynamic value to the control.
- Query for data: “Query for data” used to pull the data from another source like from another list, web method etc.
- Submit data: “Submit data” action allows to submit the data either in Database or in the List or in the Form library.
- Close the form: “Close the form” option is used to close the form on any event fire.
- Send data to Web Part: “Send data to Web Part” action can only be work when a connection has been established between the InfoPath Form Web Part and another Web Part on the page.
In this blog, we are demonstrating the Action Rule by the “Form Submit” option. To apply the Action Rule, it is not mandatory to set the condition. Below are the steps described to set the Action Rule on “Form Submit” option:
1) Open the InfoPath form and click to the “Submit Options” button provided under the “Data” tab.
2) In the “Submit Option” dialog box, check the “Allow users to submit this form” option and then, select the “Perform custom action using Rules” option. Click “OK” to apply changes.
3) After applying the above settings, “Form Submit” option get enabled provided under the “Data” tab.
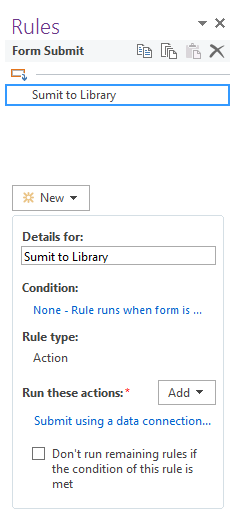
4) Click on “Form Submit” option. A “Rules” window will get open right to the InfoPath designer.
5) Open the “New” dropdown from “Rules” window and select the “Action” option.
6) In “Details for” section, you can add the name of your rule.
7) Click on “None” link in “Condition” section, a “Condition” dialog will get open. Apply the appropriate condition if needed. This step is not mandatory.
8) In “Run this actions” section, open the “Add” dropdown and select the “Submit data” option.
9) In “Rule Details” dialog box and from “Action” drop-down, select the “Submit data” action.
10) From “Data connection” drop-down, select the connection which you have created to submit the form in the form library. One thing needs to remember that first, you need to make a connection to submit the form in Form library then only you can apply the Action Rule to save the form.
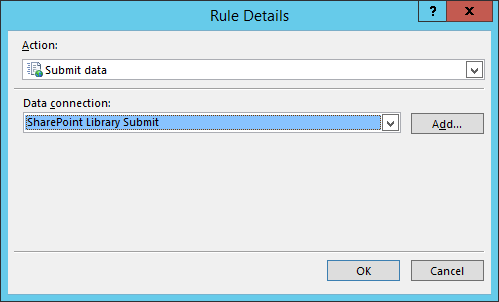
11) Click “OK” button to apply the action.
After applying the Rule to the form control, save and publish the form in the Form library. Now, after filling the forms when you will submit the form, the form will get saved in the created Form library and will look like below:


[…] 1) Open the InfoPath form and click to the “Submit Options” button provided under the “Data” tab. 2) In the “Submit Option” dialog box, check the “Allow users to submit this form” option and then, select the “Perform custom action using Rules” option. Click “OK” to apply changes. via […]
I am extremely impressed with your writing skills and also with
the layout on your weblog. Is this a paid theme or did you modify it yourself?
Either way keep up the excellent quality writing, it is rare to
see a nice blog like this one today.
How can I enable an option for a second authority for approval? in forms. i.e. once form submitted, second party has to be approve or verify. this portion required how can I achieve that